 |
Both the Hairless Chinese Crested and Powderpuff need grooming. My Hairless dogs (medium and hairy) take a bath and are shaved every week, my powderpuffs every other week. A powderpuff has a silky long coat which needs proper grooming. It needs gentle brushing at least twice a week. I also blowdry my powderpuffs whenever they had their bath. All together I spent more time grooming my powderpuffs as I do my hairless. Before a show it takes me 60-90 minutes to groom a powderpuff and app. 60 minutes to groom medium/hairy hairless. STEP 1 - Clipper | STEP 2 - Wet shaving | STEP 3 - Bathing 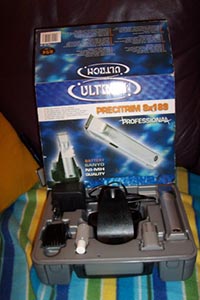 In this part I will explain step by step how I groom my medium/hairy hairless Chinese Crested.
There are lots of misconseptions about grooming your Chinese Crested. They do not need to be covered in bodylotion every day, not all cresteds are sunburnt easily.
Further shaving is also something personal. I like to have a lot of crest with my girls and rather have too much then too little hair. There are also people who see it the other way around, and this is of course all fine.
In this part I will explain step by step how I groom my medium/hairy hairless Chinese Crested.
There are lots of misconseptions about grooming your Chinese Crested. They do not need to be covered in bodylotion every day, not all cresteds are sunburnt easily.
Further shaving is also something personal. I like to have a lot of crest with my girls and rather have too much then too little hair. There are also people who see it the other way around, and this is of course all fine.
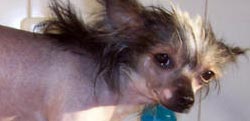
This is what Lola looks like when she hasn't been shaved for 3 weeks. Lola is a "medium" hairless with only hair growth in a line on her back.The rest of her body has just soms "fluffy" hair. I also shave this just because it looks better. I have a Ultron wireless tondeuse, specially for a small dog. The tondeuse has a narrow cutting-head. This is nescesary to make the curves on a small dog. This tondeuse costs about 65 euro. It is very easy to use and I am really happy with it. It's a Ultron Precitrim Sx189 professional. The important things you should consider buying a clipper is the narrow cutting-head and that it's wireless. I always put Lola on kitchen-height. This works easier and is better for your back. 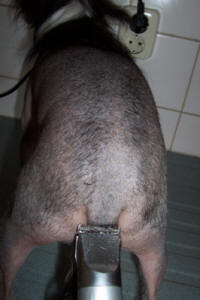 1
I always start with the tail. My preference is to shave off about 1 inch. 2
Here you can see how much hair Lola has. It isn't much, just on top it is a little hairy. After I finish shaving the tail I start with her hind legs. 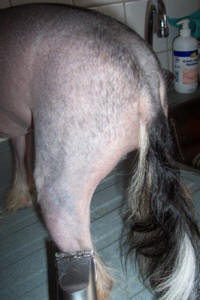 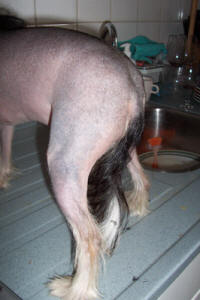 3Then I start shaving the spine. The part with most of the hair. 4When that is finished I shave the sides. Again I shave against the grain from the lower part of her tummy towards her spine. 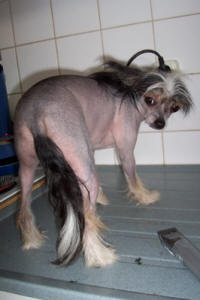 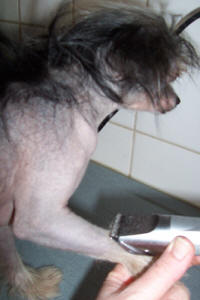 5Then the legs. Take great care in shaving the socks. Rather too little shaved off them too much. They say that shorter sox make the legs look longer, but I do not agree. I always leave the hair grow above the joint. 6
Make sure you put away the hairs of the crest when you get near to them with the tondeuse. It would be a shame when you accidentely cut them. 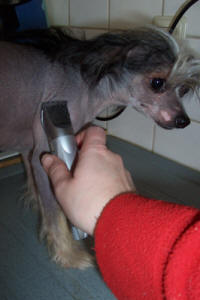 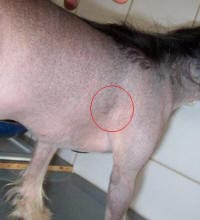 7In the red circle are still some hairs left. 8
When I pull back the skin with my hand. As shown on the picture, I can easily shave the hairs which before were in a difficult position to shave. 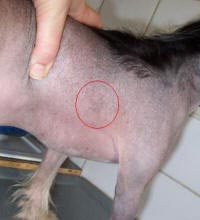  9
Now the hardest part, her head. 10Unfortunately I couldn't make any more pictures of shaving her head since I was all by myself that day...  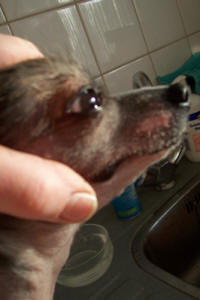 11Her you see how I stretch her mouth. This way I can shave her lips and her cheeks. After that I finish with shaving on the brigde of her nose. I use several "stretch-technics" when I do her head to shave it the best I can. But this is the one I use most often. Lola after her shaving with her clipper!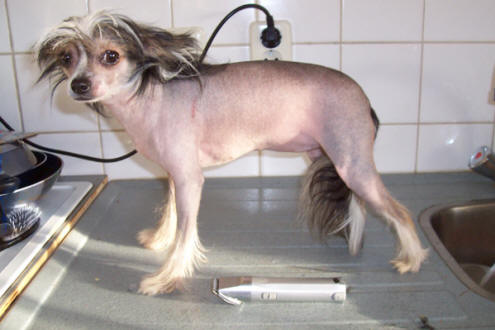 Top
TopSTEP 1 - clipper | STEP 2 - Wet shaving | STEP 3 - Bathing  These are the products you need when you are going to wet-shave your Chinese Crested:
*Shavingcream for the sensitive skin. *A sharp (preferably new) razor. *Cup of warm water to keep your razor clean. *Wet cloth. I shave Lola, my medium hairless Chinese Crested, every week. First with the clipper (tondeuse) and then with a razor. It is not rule, but I like grooming my dog and Lola has a really faboulus skin and I love to show it of... Notice, Lola is a trained dog who has been shaved al her life. She is a perfect statue when I shave her. Is your dog not used to shaving then build it up slowly and do not immediately do what I show below! 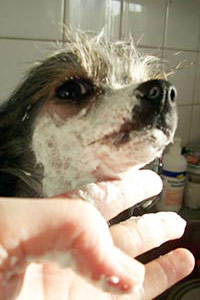 1
I always shave her with a clipper before I wet-shave her. That way most of the hair is gone and makes wet shaving easier for me and my dog. 2I start with her neck. I shave for bottom to top, against the grain. 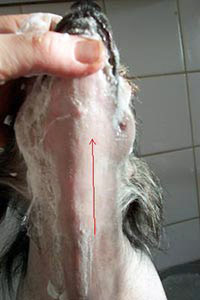 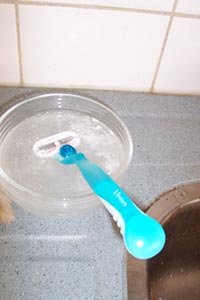 3Make sure your razor stays clean by putting it in your warm water bowl every time. If there are hairs stuck in the razor there is a big chance you might cut your dog. So keep it clean. 4Unfortunately I was alone when I made al these pictures. Therefor ther are not many of me shaving her head. 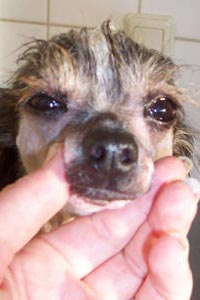 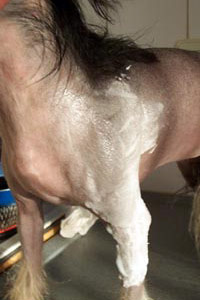 5Then I continue with her legs. The order differs from time to time. This time I start with her left front leg. You take a little shavingcream and put it on the places you want to shave. I start at the bottom and go to the top. Start on the outside, and end with the inside. Make sure not to shave away too much hair. Very important to know is that a dog can't bend the front legs sideways. If you shave the inside of the leg pull the leg forward. Hold the leg with on hand and shave with the other. 6
When that's done I start with the top of her back and her hindleg. 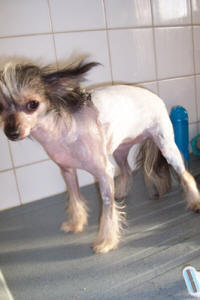 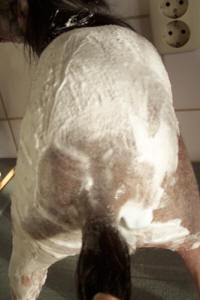 7
First shave the tail on the same height you did with the clipper. 8After that I shave her hindlegs. I shave the line I made with my shaving-cream, I start at the bottom again and end on the spine. Be aware for the knee. It's bumpy and easy to cut. Be very carefull shaving that area. 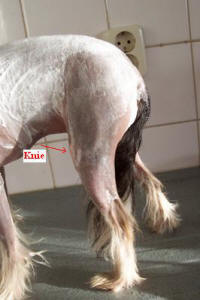 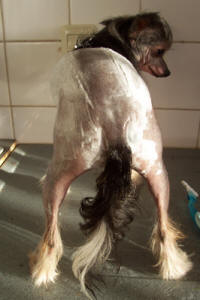 9After I finished the left leg I continue with the part where most of the hair is located, her spine. 10
Make sure to put the crest aside before you shave. It would be a shame to shave it accidentaly. 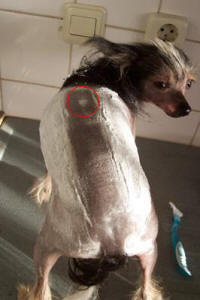 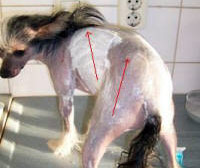 11When I'm finished with her spine I start at her upperleg towards her spine. I continue this untill I am in the front. 12I clean her body with the damp towel. 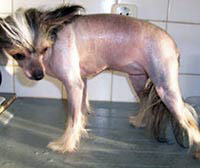  13Now the other side and frontleg. I totally cover one side with shaving-cream and start at her right backleg. 14
I (again) shave her leg neatly on the line I have marked with my shaving-cream. Start at the bottem towards her spine. 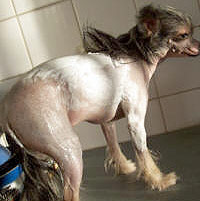 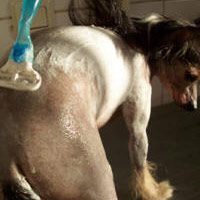 15I shave towards her head, just next to her spine. (There were most hair grows) 16This way I stretch her skin to reach all parts of her belly.You can see I make small strokes from her back to her head. 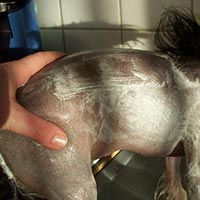 Lola after shaving with razor and cream.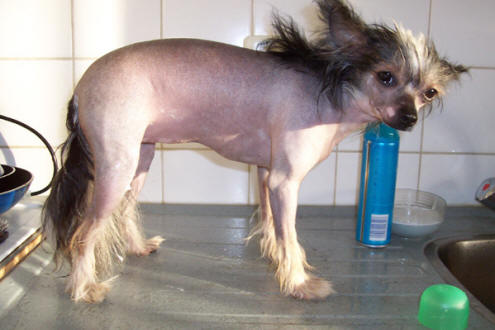 Top
TopSTEP 1 - clipper | STEP 2 - Wet shaving | STEP 3 - Bathing 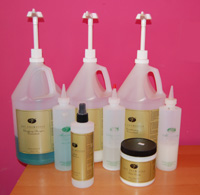 The products I use for washing and bathing my hairless. Vellus Clarifying Shampoo, Vellus Concentrated Shampoo, Vellus Conditioner, Vellus Satin Cream, Vellus Static Stabiliser .
(
Website Vellus Producten) The products I use for washing and bathing my hairless. Vellus Clarifying Shampoo, Vellus Concentrated Shampoo, Vellus Conditioner, Vellus Satin Cream, Vellus Static Stabiliser .
(
Website Vellus Producten)I wash my Lola every week. She has a no-problem, really nice and soft skin. Because Lola is so small I wash her in the sink. You always need an extendable sprayer because the tap is not handy and will not get your dog wet and clean all over. 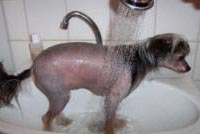 1First I make her totally wet with warm water. Then I soap her completely with Vellus Clarifying Shampoo and rinse her down with nice warm water. 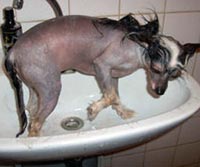 2Here you can see Lola all soaped up with conditioner. I leave the conditioner in for about 2 minutes. Make sure it will not get into your dog's eyes.  3
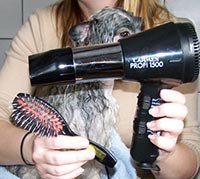
I always make sure that all my stuff is ready when I need it, so the hairdryer is ready to be used. 4I never keep the blowdryer this close. It only did this to take this picture. I blowdry her hair at a distance of aproximately 30 cm (12 inch). I go with my hand through her hair to make it dry faster. 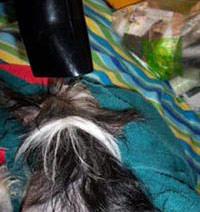 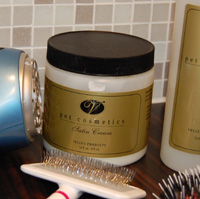 5After this I use the Vellus Satin Cream, which you can use on her skin and hair, if you are carefull you can also use it on the head.  Lola after her bath! All done!!!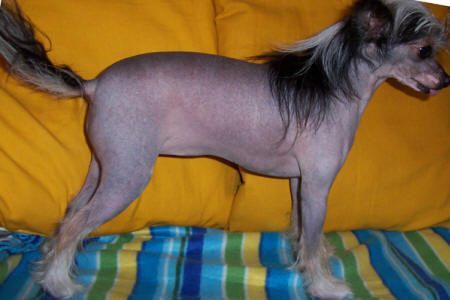
The back of Lola after her weekly bath. She needs to lose some ounces :-) It takes me half an hour to only wash her. If I shave her with the clipper and the razor before her bath it will take me at least 1,5 hours. Top
In this part I'll explain in steps how I groom my Powderpuff. The advantage of a powderpuff is that the hairs do not fall out every season as you would with a short-coated dog.
Of course broken and old hairs fall out, but you can hold your puff against your sweater without having to brush of all dogs hairs afterwards. A powderpuff is a "high maintenance" dog if you talk about grooming, as are all other long coated dogs.
I use a slickerbrush and a long pinbrush to brush them every other day (at least twice a week). I check them for mats and remove those with my hands and the slicker.
STEP 1 - Ears and Details | STEP 2 - Clipping the face | STEP 3 - Bathing 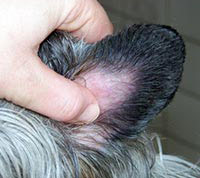 1You'll need a good clipper with a small head. I shave the ears because it makes my dog more "spicier". 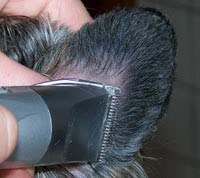 2After this I shave the inside of the ear. I make sure dat the parts of hair which I shave off, fall on the ground and not into the ear. You can put the thumb of your other hand over the hearcanal of your dog. (As you can see on the picture above) Because I do not want the ear to be completely "bold", I shave with the grain. This way I remove most hairs, but still some stay on the ear. 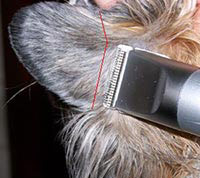 3
When I am done there, I start at the back. I leave a lot of hairs there. I start to shave from 0,5 inch above the "nick" in the ear. Below this "nick" I leave all hairs, also on the sides. 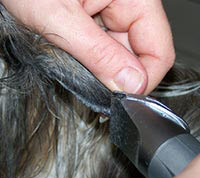 4I keep the ears flat, it shaves easier and hairs won't fall into the ear this way. Here I shave against the grain in order to get sharp and straight edges. 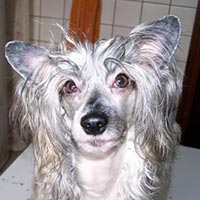 DetailsHere you see Candy with her shaved ears, and unshaved muzzle....With a powderpuff you need to check the inside of the ears on hairs which should not grown there. 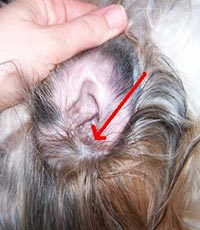 Inside the earThe hairs growing inside the hearingcanal should be removed once a month. Best methode is to grab the hairs between your thumb and index-finger as close to the bottonm as possible. Pull them out with a fast short move. Only remove the hairs INSIDE the canal, ears which grow on, but outside the canal can stay. 7
Here you can see the hairs more clearly. 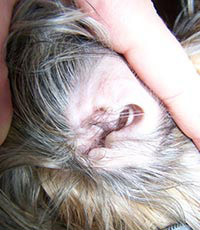 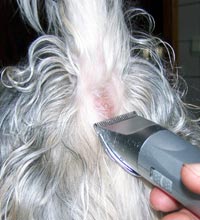 8. Anus
To make sure feaces will not stick to the hairs of your powderpuff it is usefull to trim down the hairs in that area every now and then. 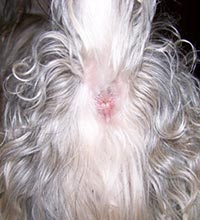 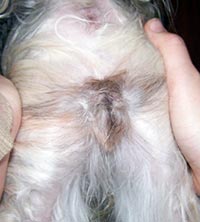 10. VulvaAs you can see there are many hairs growing on the vulva, this can cause bad smells and when a bitch is in heat, it is easier and more confortable if the hairs are removed.  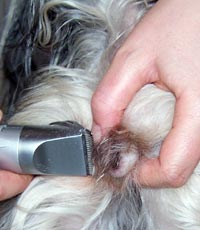 12I do the same on the other side. 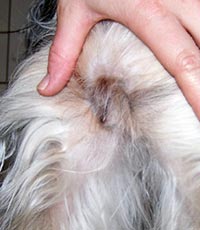 STEP 1 - Ears and Details | STEP 2 - Clipping the face | STEP 3 - Bathing For clipping the face and neck of the Powderpuff you'll need:*A good clipper with a small head and *A lot of patience :-) Further on I'd like to say Candy is used to being shaved and sits still throughout the shaving. If your dog is not used to being shaved, take the time to slowly getting used to it. Candy hasn't been shaved for 3 weeks. 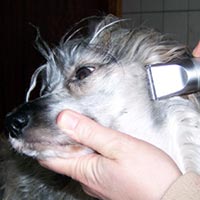 1I start at the horizontal line which goes from the ear to the eyecorner. I leave app. 3 cm of hair in front of the ear. I shave against the grain from under the ear to the eyecorner. 2From the outer corner of her eye I shave underneath the eye to the inner corner. With my left hand I pull her cheek down to straighten the skin. Always be very carefull if you shave near the eye, and make sure the dog is able to close it at any time. 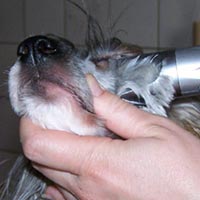 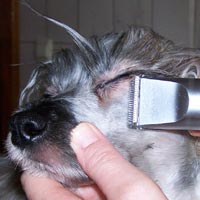 3Just below the eye there will always be some hairs left, these I shave off carefully with one the side ends of my clipper. 4After that I start a little lower again app. 3cm from the ear, against the grain in the direction of her nose. 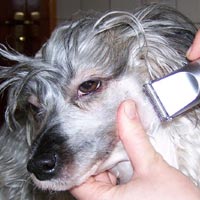 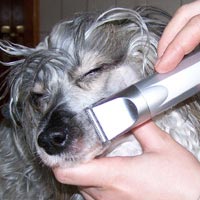 5Take extra care when you shave off the whiskers as these hairs are harder and thicker than normal hair. 6Since I always shave against the grain you need to hold your clipper in the opposite direction in which the hair grows. This way you shave the nasal brigde nice and smooth in a couple of strokes. 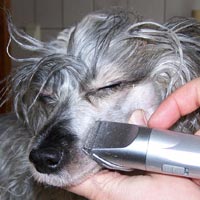 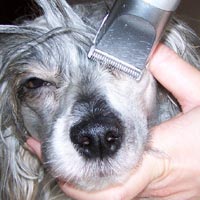 7The corners of the eye also need special attention. 8I remove the hairs on her nasal brigde from the "stop" up to her nose. Again I shave against the grain. 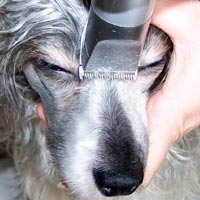 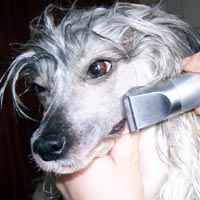 9Here you see me shaving Candy's lips. In order to get them shaved properly, tighten the lip by pulling the mouth in the direction of her ears. Then shave, along the lips, in the direction of the nose. 10At the bottom lip I do the same. Pull the mouth thight with one hand and with the other one you shave the hairs against the grain.Watch out not to hit the teeth - insiccors. 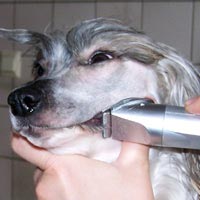 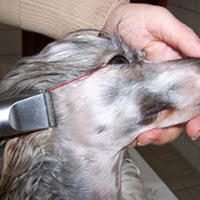 11Here you clearly see the red line I drew were I shave. Here I also leave 3cm of hair in front of the ear and shave in a horizontal movement to the outer corner of the eye. 12Shave all the way to the end.  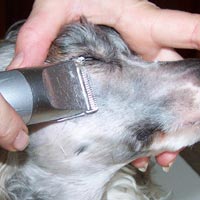 13To shave the small hairs directly under the eye you use the side tip of the clipper. 14Here you clearly see how I pull the mouth thight. 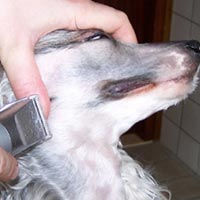 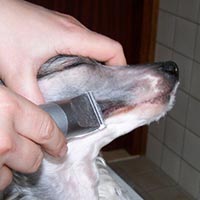 15After this I shave the lips in the direction of the nose. 16Than I shave a little bit lower, 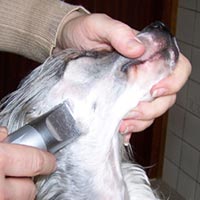 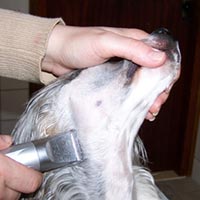 17and then again a bit lower. 18Here I pull the lower side of her mouth thight again to shave her lips nice and smooth. Watch out (again) for the teeth - inscissors... 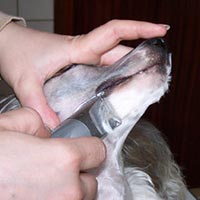 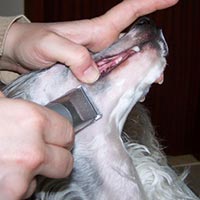 19Here I shave the details by pulling her mouth even thighter towards her ear. 20At the end I also shave the front of her nose. You can best do this from the front and shave upwards. 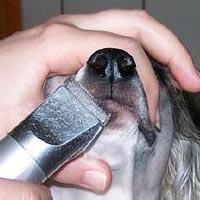 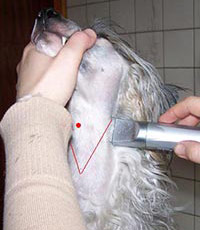 21Than I start her neck, which is shaved in a V-shape. As Candy has been shaved so many times, I shave 1 mm extra every time, resulting in a too big shaved V. Personaly I would shave app. 2 or 3 vingers under her larynx (red dot). You can always go down further. The edges I already shave against the grain, obliquely upward. 22In the bottom I make my V. 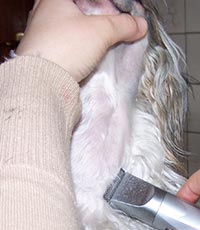 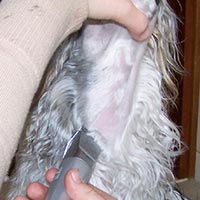 23And here the right side. 24Further I shave the complete neck starting down and then going up. I do exactly the same on the other side. 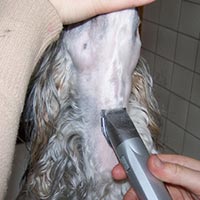 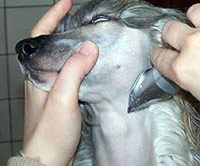 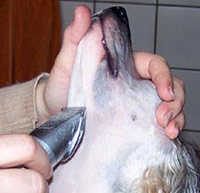 25To get the edges perfect I shave the edges one more time. I put him at odds on the hairs and go from the top to the bottom. Done!Candy with her shaved face and ears! And now we go and bathe!!! 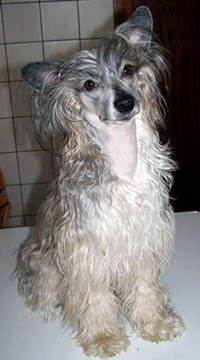 Top STEP 1 - Ears and Details | STEP 2 - Clipping the face | STEP 3 - BATHING Normally I bathe my powderpuffs at least once a month. It takes me about an hour. Powderpuffs need to be washed more because of their veal coat. Most dogs are not frequently bathed, but this rule does not apply for the Chinese Crested. If you do not do this the powderpuff coat will get a dirty and break more easily. During the washing of my powderpuff I use the following things:
Vellus ProductenThe products I use are: *Vellus Clarifying Shampoo Concentrate *Vellus Show Shampoo Concentrate *Vellus Conditioning Concentrate *Vellus Satin Cream *Vellus Static Stabiliser *Big towel *Brush *Blowdryer Always close the door,because you do not want an all wet powderpuff running around the house! Put on clothes which are allowed to get wet. Before I start washing I remove all matts. 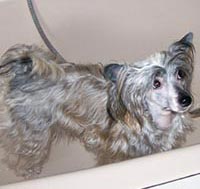 1
Usually I wash her in bath and sit with her because this is better for my back. 2
Make sure you really soak the coat with water. 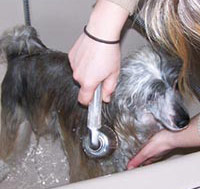 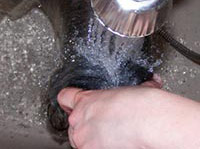 3When wetting her head I keep one hand in front of her eyes and nose to prevent water going into her nose. I also keep het head in the air for the same reason. 4I make sure she is really soaked. 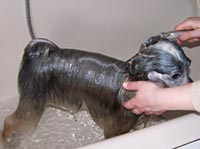 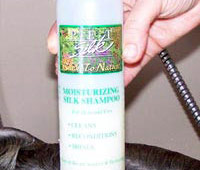 5Than I use the Vellus Clarifying Shampoo. I already diluted the concentrate with water (1:10). Work the shampoo thoroughly but gently through the coat. 6Be very careful with the eyes, as you do not want shampoo getting into them. Massage the shampoo gently and make sure you have all of the hair covered in the shampoo-water mix. 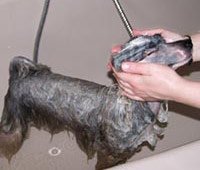 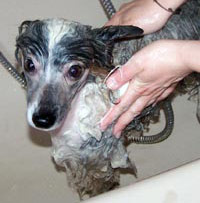 7Here you see me massaging the shampoo into the coat. 8I leave it for half a minute and rinse it out. 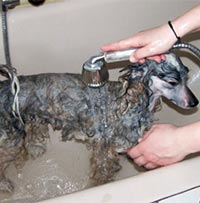 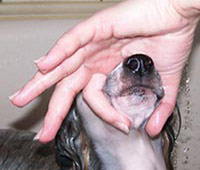 9
Again I keep my hand in front of her eyes and nose to make sure no shampoo will get into her eyes or nose when I rinse her. 10
Then I use the Vellus Shampoo Concentrate and start again at step 5. 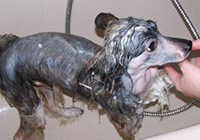 11
I massage the conditioner into the coat. I make sure that I didn't forget a single spot. Especially the armpits and other easier matting areas I treat extra with conditioner. 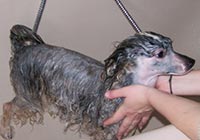 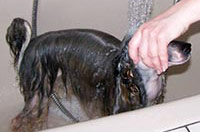 12
Then I rinse the conditioner out. 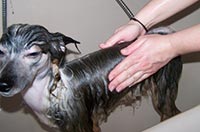 13
Then the bathing if finished and I remove the water by "wiping" it off. I push my hand from the spine downwards to her belly. 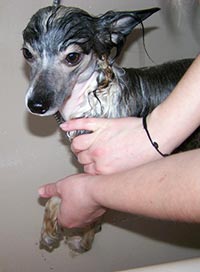 14
Last I wipe the water from the legs and paws. I move my closed hand from the top of the leg towards her paws. 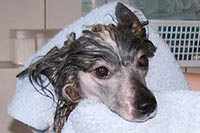 15
Than we bring in the big towel. I try to make her as dry as possible without stirring up the coat. I start with the head and then the rest of her body.  16Before I blowdry I use Vellus Satin Cream on the coat. I take a little and rub it into my hands, this I gently apply on the coat. I also helps against burns from the shaving. 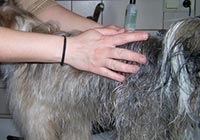 17This way I apply it onto her coat. 18
I start at the head.  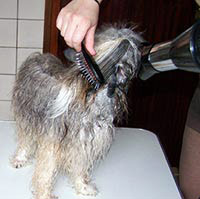 19I brush the wet coat and use the blowdryer at the same time, this way the coat will be dry sooner and get a big more volume. 20Her front, brushing the hairs sideways to get it nice and dry. 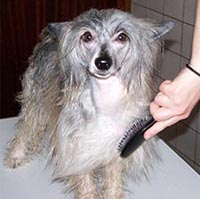 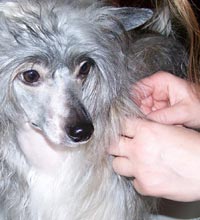 21
Found a little matt... 22Candy does not like her legs blowdried, so here I put the dryer on the table so I have one had to hold the leg and one to brush. When completely done the Vellus static Stabiliser is sprayed over the coat and....finished!  Candy after the shave, wash and blowdry!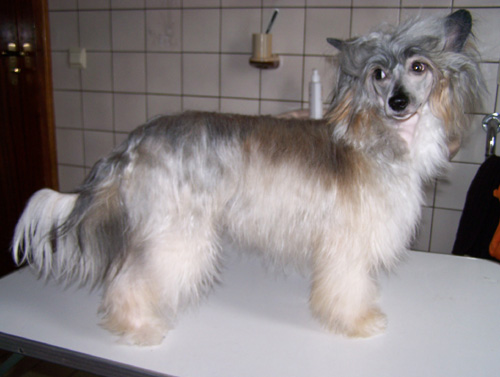 Top
Top |
| © timegarden.nl 2005-2026 - All rights Reserved |